Do you enjoy observing nature with your kids?
What is your favorite time of day to be outside?
Have you noticed how the light at different times of day changes how we see the colors around us?
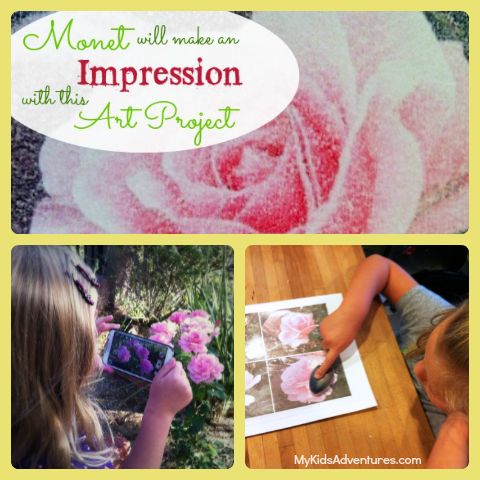
Capture your “impressions” of the outdoors and learn how to make them come to life with a fun and easy art project.
In this article, I’ll introduce you to Claude Monet, one of the leaders of the Impressionist Movement, and show you how he captured his “impressions” of the outdoors in paint.
This will be your inspiration to explore the outdoors and turn your “impressions” into art using an easy photo transfer technique.
What is Impressionism?
Impressionism is a movement in painting that originated in France in the late 1800s. Most impressionist painters focused on capturing the “impressions” of light and color outdoors.
Impressionistic paintings are usually created by the artist using strong bold colors and short brushstrokes.
Here are some examples of impressionist paintings.

Claude Monet – Haystack, 1865 / Camille Pissarro – Orchard in Blossom Louveciennes, 1872 / Mary Cassatt – Lilacs In A Window, 1880
ALL IMAGES COURTESY OF WikiPaintings.
Spend some time in your local library exploring Impressionism in art books or do some research with your kids online. You can explore a vast collection of artwork on the art movement: Impressionism page of WikiPaintings.
Who is Claude Monet?
Claude Monet was born on November 14, 1840. He is one of the most famous painters in the history of art and a leading painter of the Impressionist Movement.

Monet’s painting Impression, Sunrise was described as “impressionistic” and this term was adopted by other artists of the time that painted in a similar technique.
Claude Monet – Impression, Sunrise 1873 Painting courtesy of WikiPaintings.org
Monet is most known for his series of paintings depicting the same subject matter during different times of day and in different weather. Monet painted many every day subjects like haystacks, water lilies, buildings, and churches.
Here is an excerpt from Monet’s biography on Biography.com.
“Sometimes Monet traveled to find other sources of inspiration. In the early 1890s, he rented a room across from the Rouen Cathedral, in northwestern France, and painted a series of works focused on the structure. Different paintings showed the building in morning light, midday, gray weather and more; this repetition was a result of Monet’s deep fascination with the effects of light.”
This series of paintings is beautifully captured in this video:
Why “Impressionistic” Photo Transfers?
Creating impressionistic paintings can be very time-consuming and outdoor lighting changes quickly! Let’s take the essence of what an “impressionist” observes and create a fun and easy photo project.
I’m going to show you how to turn your outdoor photos into “impressions” that you can transfer onto paper!
The original inspiration for this technique can be found here.
You Will Need
- Camera
- Transparency sheets for a copier (not inkjet) (1 per print)
- Inkjet printer
- Sheet of white artist paper suitable for pens/markers/drawing
- Large spoon
Preparation Time
10 minutes to gather supplies. (You may need to plan ahead to purchase transparency sheets as this is a not a typical item found in most homes).
Activity Time
Outside Time
- 15+ minutes outside over one or two days at different times of day to capture the photos needed. It’s best to plan this project for a day when you’ll be around your house to make it easiest to take your photos throughout the day.
Inside Time
- 30 minutes on a computer to create a collage of photos.
- 30 minutes to print and transfer photos to paper.
Location
Any place outdoors for photos and inside with a computer and printer to complete the project. The ideal place would be your front or backyard for easy photo-taking opportunities.
#1: Be Inspired!
Before you start, share the Monet video with your child and talk about how different each of his paintings are of the same subject. Notice how much the colors of the subject changed depending on the time of day and the weather when he painted them.
Can you guess by looking at these paintings what time of day Monet may have painted them?

Here is a snapshot of Google image search results for “Monet Rouen”.
Discuss with your child what they will observe when you go outside.
Will the light be bright outside?
Is the sun still rising?
What might you find?
Be prepared to observe your surroundings and see the outdoors like an Impressionist!
#2: Head Outdoors
Grab your camera and go outside. Spend some time with your child outside and observe the light and colors around you.
Talk about what you see as you observe…
How is the light?
Is it bright?
Is it soft?
Do the colors you see appear bold and bright or are they soft and less bright?
Find something your child likes that they would like to photograph for this project. Explain to them that you will take several photos throughout the day to capture different “impressions” of the same subject in a different light.
Take several photos of your subject so that you have plenty of choices later.
Allow several hours to pass and then head outside again and take another photo of your subject.
Do this several times throughout the day to record your subject in different lighting.
Ideally, you will take photos at 3 or 4 different times of the day. If you don’t get enough photos the first day, maybe take a few more the next day at a different time.
See how the lighting changes the colors throughout the day. Spend this time with your kids observing the beauty that can be as close as your own front yard!
#3: Create a Photo Collage

One of the easiest ways to quickly edit or collage photos is to use PicMonkey.com.
**PLEASE NOTE – THIS POST HAS NOT BEEN UPDATED AND IMAGES DO NOT REFLECT CURRENT PICMONKEY SCREENS**
THE CONCEPTS AND PROCESS OF HOW THE IMAGES WERE MANIPULATED ARE THE SAME. 🙂


The first step is to create a photo collage of the images you would like to use.


Set your resolution at the bottom of the screen to 3000 x 2400 for an 8 in. x 10 in. photo presentation.
In order to transfer the photo how you are seeing it, we need to print the mirror image of the photo. Click on the icon of crop marks and you can select “Rotate”.
I’ve indicated the mirror image icon with the yellow arrow. Once you rotate the image, click “Save”.

#4: Print Your Collage
You will be printing your collage on the transparency sheet with your inkjet printer. The transparency sheet will NOT absorb the ink* and the sheet will be very WET when it’s finished printing.
*Please note this is reason you need “copier” transparency sheets and not inkjet transparency sheets.
Since the inkjet printer shoots tiny droplets of ink onto the transparency sheet, this will mimic the small dabs of paint like an impressionist. Sounds cool!
Gather your white paper and transparency sheet.
Print your photo!
I found that using the normal setting for plain paper worked best. You may need to try different settings for your printer for the best results. Hit print!
The print will be VERY WET!
Please note: ADULT SUPERVISION REQUIRED TO HANDLE THE TRANSPARENCY PRINT to avoid smears and smudges.
Carefully retrieve the transparency from the printer.
Handle the print very carefully as the wet ink can smudge easily.
Now time to transfer your photo to paper!
#5: Transfer Your Print to Paper
Carefully place your transparency with the wet ink side down onto your white paper.
Carefully hold or tape the transparency sheet down to the sheet of paper.
Use your hand to smooth the transparency sheet on the paper to begin the ink transfer. Be careful not to move or wiggle the transparency sheet.
Take the back of a spoon and gently rub the transparency to transfer as much ink as possible.
Move the spoon over the image in several different directions with smooth firm pressure to help the ink transfer evenly.
Carefully transfer the ink to the paper by rubbing the transparency with the flat side of a spoon.
You can carefully lift one corner of your transparency to see if the ink has transferred enough. The ink will not transfer completely.
The goal is that you have an “impression” of your photo on the paper, not a perfect photo transfer.
Lift your transparency sheet from the paper when you have transferred as much ink as possible.

Voila! You have captured your “impressions” on paper!
Take a moment to observe the print with your child and talk about what you see.
Notice how the tiny droplets of ink have transferred to the paper.
These tiny droplets up close might look blurry and messy but when you step away with a little distance, you can see your subject emerge from your “impressions”!
What do you notice? Can you see how different the colors are in each photo of the same subject? What time of day do you see the brightest colors? What time of day are the colors less bright?
Which photo does your child like the best, why? Which one do you like the best?
Have your child sign and date their print to remember the time you spent together creating a unique one-of-a-kind piece of art!
Some Final Thoughts…
I hope you enjoyed bringing your photos to life and seeing them as an Impressionist! Next time you’re outside together remember to enjoy the moment and capture the “impressions” of your day.
Spending time with your kids enjoying nature and taking the time to appreciate the beauty around us is always time well spent.
Capturing that beauty with a piece of art is always a great reminder!
What do you think?
Did you enjoy this mini art history lesson on Impressionism?
Will you look at things differently next time you go outside?
I’d love to hear your thoughts and see your artwork. Please share it below.